Saturday, June 23, 2012

Mirror

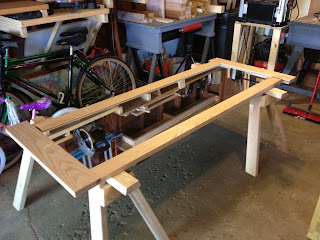
Decided to build a little frame for a mirror we inherited when we bought our house a few years ago.  The mirror was bolted to a back of a door which we replaced shortly after moving in and the mirror has been sitting in the basement since.  The mirror is 24" x 60" and 3/8" thick.  I thought it would be a quick easy project and for the most part it was.  Make the stiles and rails at 2 1/2" - bottom rail at 7" groove the stiles and rails with a 1" x 3/8" channel and then biscuit joint it together.  While cleaning  up one of the edges of the stiles I dropped it and it cracked one of the lips from the channel.  I ended up having to glue and re-attach the lip.
I was really worried that when it came time to stain and finish the glue seam would be noticeable.  I did end up smooth planning all surfaces hoping it would blend it better.

1" x 3/8" Channel


Smooth planned; dry assembly

In the end the glue seam was not noticeable and General Finishes Rosewood stain went on very smoothly.


What are these??
Bow-ties for Pinocchio?


When I first thought of how I was going to put the mirror frame together I thought I would joint them with a double dovetail (bow ties).  The wood I got ended up having a really nice grain pattern so I decided not to interrupt it with the dovetails.  Thanks again for reading!!  Please leave comments or suggestions!!


Sunday, June 10, 2012

The Toy Box

I decided to build (and design on the fly) this Toy box for my daughter using the left over Southern Yellow Pine from my woodworking bench.  I tried to avoid having knots but since I was using left over wood I wasn't completely able to accomplish this.  I was able to minimize the knots to the interior and back of the case.
I really like the end grain pattern in the SYP so I decided to showcase it a little by finger jointing the case for the box.  This was the first time I did finger joints and decided to keep it simple...sort of...I cut all the wood into 1 1/2" strips and then cut those strips to match at corners making the finger joints.  So basically I had two lengths to cut for the front and back at 30 1/8" and 29 1/4" - the longer length would have the end grain exposed on the sides.  The sides were made in the same manner as the front.  With both the front/back and sides I left the exposed end grain 1/8" long to overshoot the corners; after glue up I flush trimmed them with a router.


I trimmed the top and bottom with a standard Ogee pattern and glued them flush to the case.  If I had planned this over and had the wood I wanted I would of attached the trim using a sliding dovetail joint. 


Finally I built the lid in the same manner as the the case from 1 1/2" strips.  Another first for me - I decided to hand plane the lid smooth.  The pictures below show the finished underside of the lid.


The plane I used (pictured above) is an old Craftsman (probably a #3) I got at a flea market for $10 and cleaned up.  


Awww - smooth!!  Again I love the end grain pattern!! 

Final product - I finished it with a light amber shellac to bring out more of the yellow in the wood. 


Thanks for reading!!  Check back soon for another post!!